crush_
Glod Menbie
-
Joined
-
Last visited
Everything posted by crush_
-
-
Smh capitalism. Glod for the working class! Glod for everyone!
-
-
Compiling Mono on Android gang.
-
-
https://github.com/UnknownShadow200/MCGalaxy/archive/master.zip Download this, unzip it, run MCGalaxy.exe if you are on Windows. That's it.
-
You don't - just run the server and then click "Direct Connect" in ClassiCube. Then, type your name, and in the IP text box enter "127.0.0.1" and click Connect.
-
-
heh....tilt my head down so that the brim of my fedora casts a mysterious shadow on my face You sure about that? before the poor fool can answer, I leap 13 feet into the air somersault over the clueless creature as I unsheath my katana deliver one fatal swipe of my masterwork blade with a satisfying, split second -swish- land in a mysterious crouching pose, my face still shaded mystically assailant collapses in two halves HEH.....Guess you were only half sure put my katana back in its scabbard twirl and make my cape wave in the wind to formally conclude the engagement ....See ya....wouldn't wanna be ya.....HEH walk off mysteriously into the shadows
-
-
-
-
-
Have you ever seen ****'s Bizzare Adventure?
-
You can't host a public server without port forwarding, you can still host a LAN server though.
-
You can search for server by typing the name in the white rectangular box in the desktop client. [BLACKJACK] {MegaNation} DerpNation is the full name
-
DerpNation?
-
ANDREW STOP MOLESTING THE STATUE, U WANKER
-
relatable.
-
-
He's an alright lizard.
-
-
-
yes, hello
-
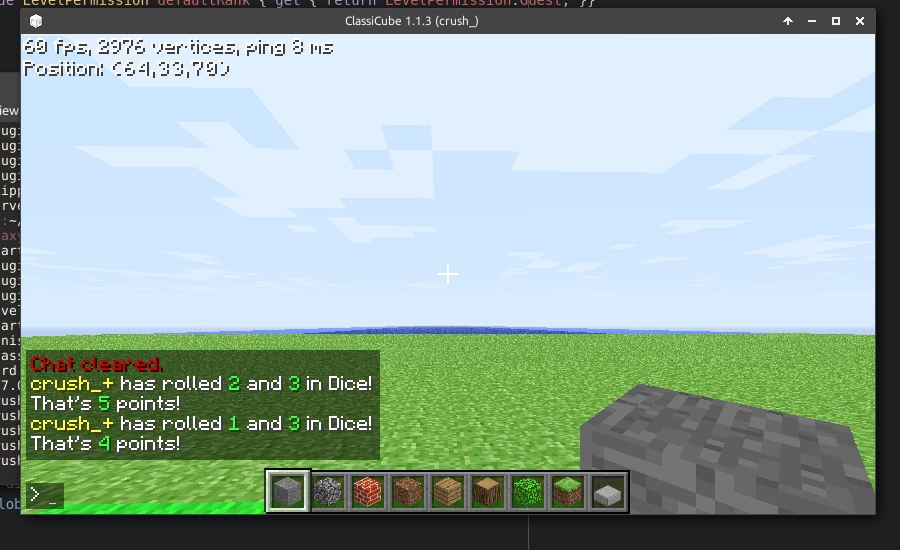
This is the absolute most sickest tutorial ever, don't delet, andrew Hi there. You may have tried hosting your own server and you feel as if the server feels a little bit desolate. Surely, you want to spice it up with fun chat commands or helpful building commands! Thankfully, writing your own plugins for MCGalaxy is relatively straight-forward. Note, this tutorial will help you go through the absolute basics of creating an MCGalaxy plugin.. Knowledge of general programming and/or C# is recommended, but not required to follow this tutorial. What are we doing? A super-simple dice-throwing chat command. You can extend this plugin to function as a simple gambling game by making it cost money with possible prize money. You can find the code here. What do we need? You obviously need MCGalaxy to compile and use the plugin. I suggest using a text editor with syntax highlighting capabilities such as Notepad++ or Atom. Starting out MCGalaxy plugins are written in the C# programming language, so we need to create a C# file. It doesn't really matter where you create it, but in order to compile the code you need to place the file into MCGalaxy's /plugins folder, so I'm going to create the file there. My file is called "Dice.cs". Now open the file and start actually writing the plugin. Before we can do anything, we need to include the basic MCGalaxy modules to be able to manipulate the server. using System; using MCGalaxy; using MCGalaxy.Commands; After that, we need to define a namespace our plugin will be a part of. I would suggest putting all of your plugins in a namespace with you server's name. namespace myServer { } Now, inside the aforementioned namespace we need to create a class that specifies info of our plugin for MCGalaxy. public sealed class DiceGame : Plugin { public override string name { get { return "The Dice Game"; } } public override string creator { get { return "myName"; } } public override string MCGalaxy_Version { get { return "1.9.1.9"; } } //This part runs when the plugin is loaded public override void Load(bool startup) { Chat.MessageGlobal("&aDice plugin succesfully loaded!"); } //This part runs when the plugin is unloaded //Make sure you unregister any commands //you have registered in Load() public override void Unload(bool shutdown) { Chat.MessageGlobal("&cDice plugin succesfully unloaded!"); } } Our class inherits elements from the Plugin class, since we need to tell MCGalaxy that we are creating a plugin, and the Plugin class has the elements that would be boring (and unproductive!) to rewrite those elements over and over again every time we tried to write a plugin. The elements we specify explicitly have the override specifier. That means the elements were already defined implicitly by the Plugin class, but we need to "override" or redefine them for our own purposes. The first few elements are quite self-descriptive. We define the name of the plugin, the creator, and the MCGalaxy version the plugin was designed for. The latest version of MCGalaxy at the time of writing this tutorial was 1.9.1.9, so I will just specify that. The next element is the "Load" function. This function is being run whenever we load the plugin. For now we will just output a message to the world that signifies our plugin has been loaded. The same can be said about the "Unload" function. '&a' and '&c' are the symbols to change the colour of the text that comes next. You define the colors with an & symbol and the number of the colour. The colours go from 0 to f. It is worth noting the commands take a bool value that specifies whether the functions were run on server startup or shutdown, respectively. Since we are creating a chat command, we now need to create a class to tell MCGalaxy we are creating a new command. This is done similarly to the plugin definition, as we are now inheriting from the Command class. public class CmdDice : Command { //You use this name to actually run the command //So in this case we make the command be activated with /dice public override string name { get { return "dice"; }} public override string shortcut { get { return "roll"; }} public override string type { get { return "fun"; }} public override LevelPermission defaultRank { get { return LevelPermission.Guest; }} public override void Use(Player commandUser, string args) { } public override void Help(Player commandUser) { Player.Message(commandUser, "%T/dice"); Player.Message(commandUser, "%HRoll dice."); } } Besides specifying the name of the command, we can (but don't have to) specify a shortcut to be used for the command. Curiously, the shortcut can be longer than the name. The 'type' variable defines the category our command will show up in when a player uses the /cmds command in-game. The next variable defines what ranks can use the command by default. The 'Use()' is the actual function that is being run when a user uses our command. The function must have 2 arguments. The first one is the player that uses the command and the the second is the text the player enters after the command (command arguments). The 'Help()' function is the function that is being run when the user enters "/help <commandName>" into in-game chat. In this function we send the Player that is being specified a message with the 'Message()' command. '%T' and '%H' are similar to the colour symbols we used earlier, however, the colours that those symbols will turn the text into depend on the server. '%T' is the symbol for the chat titles and '%H' is the symbol for a default help string. It is advised to message command help in this way. Now we need to make our 'Use()' command actually do something. Since we create a dice simulator, we need some way to create random numbers. In C#, you do that with a Random object. public override void Use(Player commandUser, string args) { //Create a randomizator object Random random = new Random(); Now every time we need to create a random number, we call the 'Next()' method of the Random class. Since dice have sides with 1 to 6 dots, we generate a random number from 1 to 6 for each dice. //Create a variable called 'dice1' //And assign it a random random from 1 to 6 int dice1 = random.Next(1, 6); //Same for the second dice int dice2 = random.Next(1, 6); //Create a variable that's the sum of the both dice to calculate total points int score = dice1 + dice2; Now, we want to message the score of the user into the world chat (you can also message the score to the user only using the 'Player.Message()' method from before. public override void Use(Player commandUser, string args) { //Create a randomizator object Random random = new Random(); //Create a variable called 'dice1' //And assign it a random random from 1 to 6 int dice1 = random.Next(1, 6); //Same for the second dice int dice2 = random.Next(1, 6); //Create a variable that's the sum of the both dice to calculate total points int score = dice1 + dice2; Chat.MessageGlobal(commandUser.name + " &fhas rolled &a" + dice1 + "&f and &a" + dice2 + "&f in Dice!"); Chat.MessageGlobal("&fThat's &a" + score + "&f points!"); } We are not done yet. In the plugin's 'Load()' and 'Unload()' we need to register (and unregister) the command we have just created. //This part runs when the plugin is loaded public override void Load(bool startup) { Command.Register(new CmdDice()); Chat.MessageGlobal("The Dice Game plugin loaded!"); } //This part runs when the plugin is unloaded //Make sure you unregister any commands //you have registered in Load() public override void Unload(bool shutdown) { Command.Unregister(Command.Find("dice")); Chat.MessageGlobal("The Dice Game plugin unloaded!"); } Note how we register the new command with the class constructor of the class we created, however, we unregister it by the command name we specified inside the class. Compilation Assuming your code is in the '/plugins' folder, you now need to start MCGalaxy. I'm going to run it via MCGalaxyCLI.exe, however you can use MCGalaxy.exe as well. Now we compile the plugin with "/pcompile Dice". If everything is alright, the plugin should be compiled and .dll file should be created. Now we can load the plugin with "/pload Dice". This is it. Your plugin should be working now, and you can test it with "/dice" or "/roll" in-game! If it's not working, be sure to check for any typos. If you can't find the problem, you can check out the code or ask me in this thread. Notes: Since this only a command plugin, we could have instead only compile the command and not specify the plugin by placing the code in the '/extra/commands' folder and using '/compile' and '/load' commands for compilation and loading instead.