75
Member
-
Joined
-
Last visited
Everything posted by 75
-

-
Stop wasting time and join Omegabuild 3 [Alpha]!
-
FreebuildBlacklist plugin Source: https://gist.github.com/SpicyCombo/d807840b2b33bf81a2c843c84d04cf24 The FreebuildBlacklist plugin is a freebuild management plugin, it allows staff members to blacklist/unblacklist players from select maps, and also allows for players to report grief at the selected Freebuild maps. Features Checks and adds the player to the perbuild blacklist of the particular map if it's added in /freebuildblacklist Removes the player from the perbuild blacklist if they are no longer blacklisted from all maps when they join it ReportGrief allows the staff to use /rg go [#] to quickly view reported grief Use /help fbb and /help rg in game on more information on how it works. -- Created by Omegabuild Development --
-
-
Posting the logs of the crash might be helpful, you might want to right click the page, click Inspect, and navigate to the Console tab, and screenshot the red exception part and upload it here. If not, no one will be able to assist you
-
Must have exposed your account password to everyone, that’s really fun Unless if it was /client, it is likely everyone saw your password in chat Even then, when CEF syncs the open windows it will also transfer your account password
-
https://imgur.com/a/mi8ZLuF
-
As responded to you earlier, you can pay for hosting. Lemehost allows you to pay for hosting. Although I'd much prefer you to choose other reputable hosts like DigitalOcean, OVHCloud, or Linode (Akamai Cloud Computing), though you would need some Linux knowledge to set up the server properly Good luck!
-
I deleted the last bit of code on accident. Gist has been updated again. https://gist.github.com/SpicyCombo/7c8355522042370d0dfa291e6f8653e1
-
-
the command itself looks really simple, all it does is it prints a wall of text, or fetches a text file and then prints what's from that text file. I think I can believe that you made it with the help of ChatGPT, but damn why do you have to let ChatGPT write the post for you? Having ChatGPT write the post is the funniest funny of the funnies I've seen today congrats bro
-
Hey, as from Venk's response on the ClassiCube Discord, it was my fault earlier for asking you to change the database name from XP to Levels. I confused myself with my own plugins instead. Please use this version of XP.cs and FormatPrefix.cs, which should help solve these problems. I apologize for the confusions! https://gist.github.com/SpicyCombo/7c8355522042370d0dfa291e6f8653e1
-
You also had to add p.SetPrefix(); for when the player doesn't exist in the database. Anyways, I've also done the following for you: added /XP give, /XP take, /XP code at the top, I updated the usage on how to issue player XP You can see the new version here: https://gist.github.com/SpicyCombo/dd0ec6e654e17c8462a2d8c2bb02fb88 I might also just make a pull request on Venk's repo, and the MCGalaxy-plugins repo
-
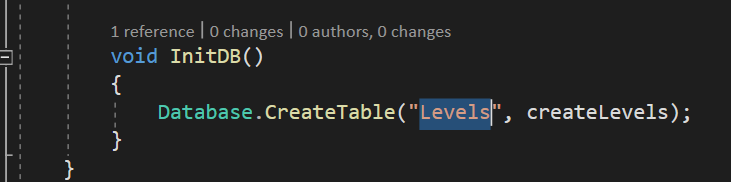
yeah the plugin from Venk's repo has multiple problems It's meant to store and retrieve data from the XP database table, but instead it creates a database table named "Levels"... Change "Levels" to "XP" should fix it not sure if there are additional problems that you need to fix, but that's it
-
Line 133 of XP.cs

-
You need to call p.SetPrefix(); in the XP plugin each time the player’s level is updated.
-
No. FormatPrefix adds to the player’s prefix, but Shortname changes the player’s nickname that is all
-
It was not compiling because the plugin is missing the using statement for the Database class. Adding the below line at the top of the file should make it work. I've updated the GitHub Gist. using MCGalaxy.SQL;
-
For your first request, I have a plugin that does that on Omegabuild. Please see https://gist.github.com/SpicyCombo/ab3da242a187f0c8c74584b250aba30e For your second request, you can take a look at https://github.com/cloverpepsi/MCGalaxy-stuff/blob/main/CmdShortname.cs
-
I've modified the guide. Thank you for for letting me know.
-
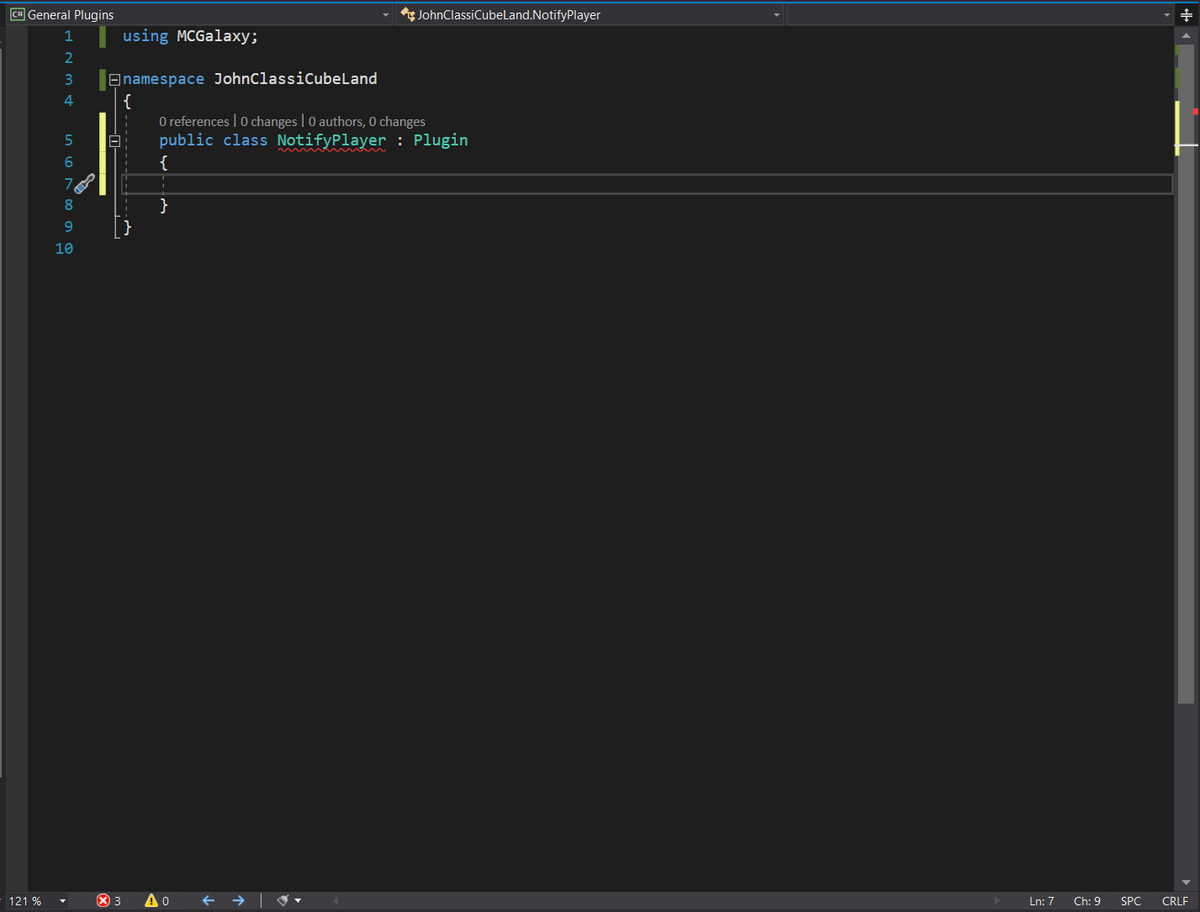
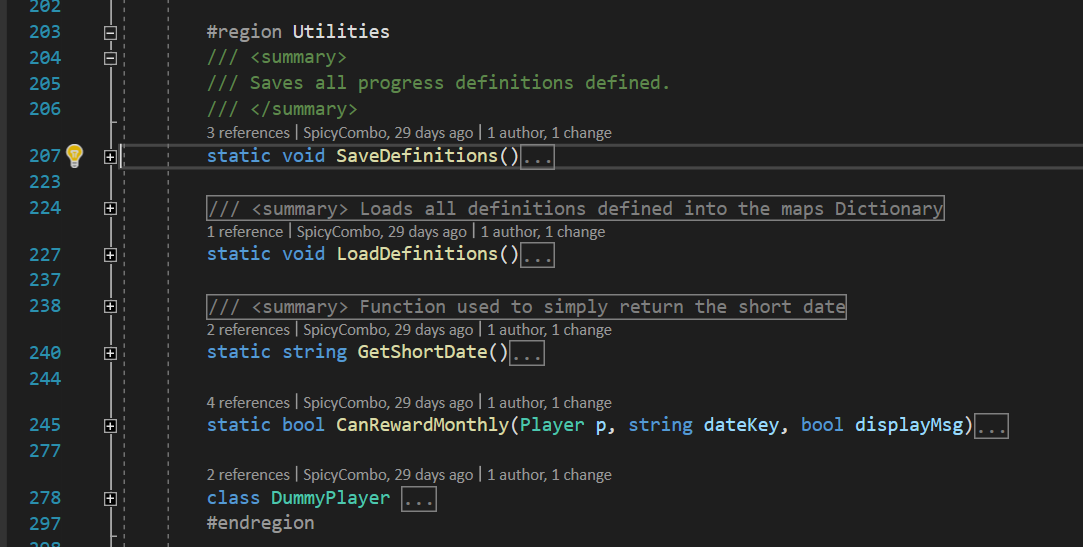
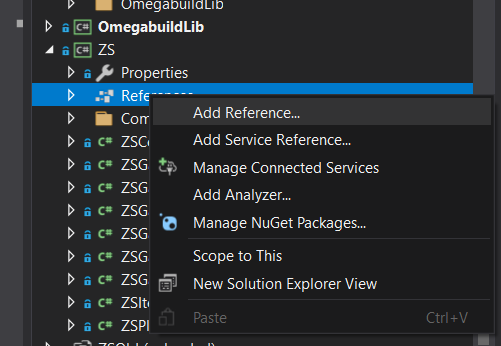
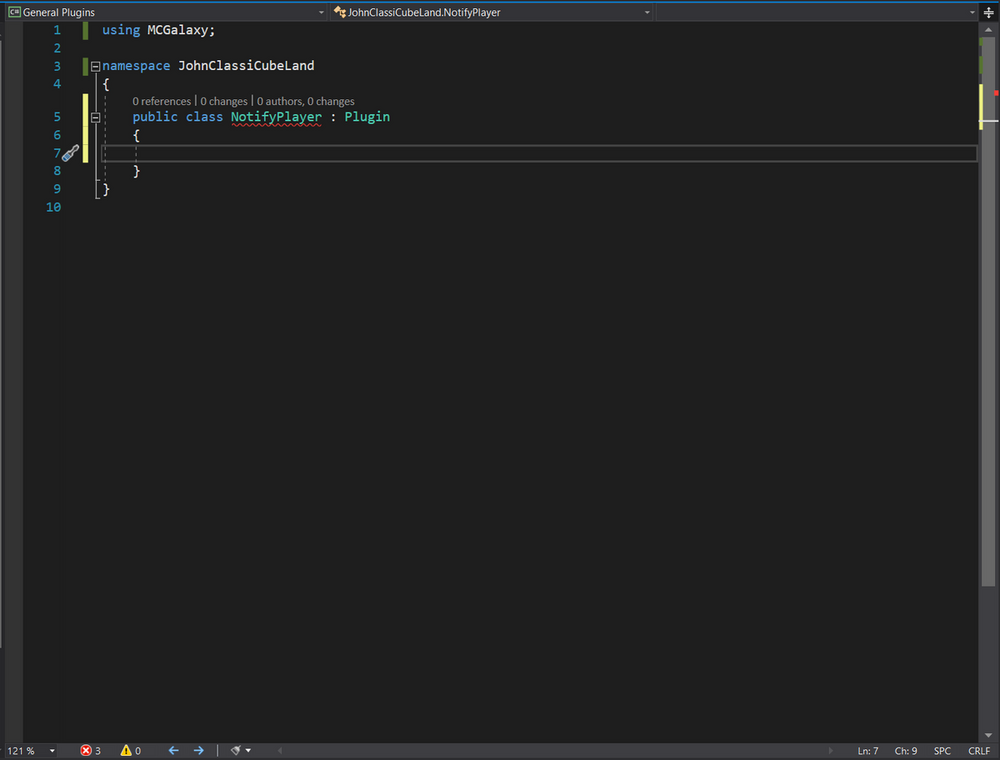
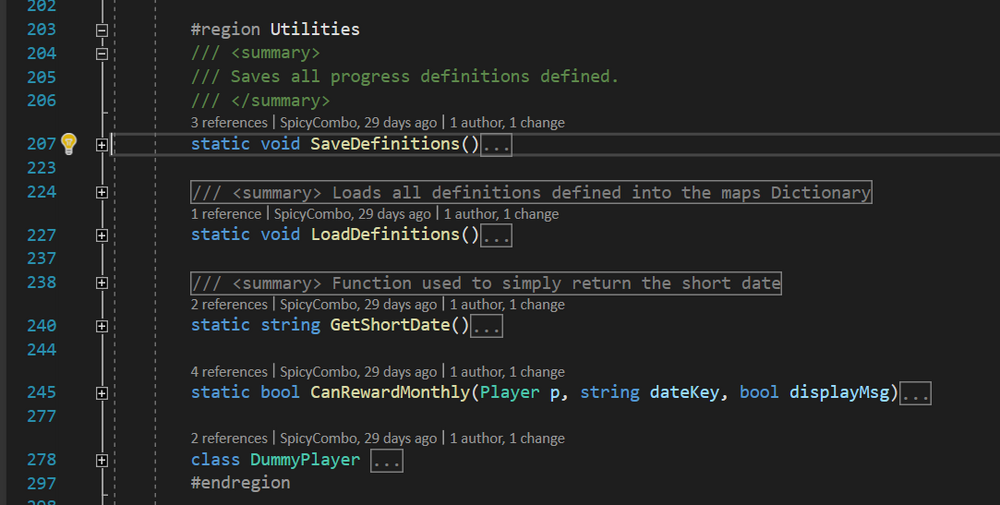
[transmission started] You might want to create a server, and you've also read some tutorials involving the server creation guide, and how to get new players, but what you realize as a major part is, you need custom content. This custom content would mean some unique game mode, or some cool maps that distinct yourself from being a regular free build server. This is where plugins come in. What are plugins? Plugins are custom code written by you or someone else, and when loaded, will execute code to modify the server's behavior (which can include, but is not limited to, triggering additional actions upon events being called, registering a new command, registering a new TopStat (/top), modifying what the TabList looks like, etc). How are they made? Plugins are .dll files (dynamic-link libraries), aka program extensions that are compiled from source files, which in other words are human-readable text/code. Generally, these source files are written in C#, but there is also options for writing these plugins in other .NET programming languages. The DLL file is produced by a compiler, which could be the built-in server compiler on MCGalaxy (using the /Compile command), your IDE (the code editor), or the dotnet command line tools. In this tutorial, we will be looking at using the server and using Visual Studio 2019 to compile code. NOTE: MCGalaxy is targeted at .NET framework 4.0, which is an older .NET framework. Meaning, you cannot use newer syntaxes/features unless you re-target MCGalaxy and self-compile the server software, which is strongly not recommended. If you have Visual Studio 2019 Community or Professional installed on your personal computer, and given that you are hosting the server on your personal computer, the server will look and use the compiler from Visual Studio, however. Now with the two major questions answered, let's get to the process. Setting up your workspace.Before we start talking about the code structure of how plugins are written, let's get the software required set up. IDEs (Integrated development environment) are software used to write your code on, you can say they are a more advanced text editor, given we are really just editing plain text files that have a fancy file extension (in this case, the file extension is .cs). The following software are what I recommend for using to write your code on. 1) Visual Studio 2019 (Windows users only) 2) SharpDevelop (Windows users only) 3) MonoDevelop (Linux users only) 4) Visual Studio Code (Cross platform, there's also a web version but it has limited functionalities) In this tutorial, we will only be using Visual Studio 2019, so unfortunately if you would like to use the other software, you will need to ask someone else for assistance to that software. How to install Visual Studio 2019: Unfortunately, Microsoft is a poop head who decided to remove the installation packages for Visual Studio 2019 from their website. So, you will need to source the installer from somewhere else. Chocolatey happens to have sourced the installer to VS 2019, which you can find from this link: https://community.chocolatey.org/packages?q=visual%20studio%202019 You can choose any edition of Visual Studio, because there are already keys online that can be repeatedly used to give you access to any edition. (It's not like Microsoft is trying to make money off the older edition anyways, why do you think they removed it from their website?). I found the keys https://gist.github.com/ansarizafar/7234695e0837c92283144699c3f27532 Chocolatey is a package manager, which is simply software that manages the installations of other software. However, the process to install it is slightly confusing. For our case, we are not setting this up as an organization, and it is assumed that you're using Windows. So, you can open the installation page for Choloatey https://chocolatey.org/install and then select the Individual option. Then, you will open Windows Powershell in Administrator mode, copy and paste the line of code from the website (where it says Set-Execution-Policy) into Powershell, and press enter. Once Chocolatey installs, navigate back to the Chocolatey package search web page, and copy the command to the edition of Visual Studio you would like to install, and paste that into Windows Powershell, and press enter. After this finishes, you're all good to go! Installing Git Version Control / GitHub Desktop (optional) Version control is used to synchronize the copy of the code from your computer to a remote server. This allows for you and other people to collaborate together. The popular options for the remote servers are GitHub and GitLabs. You can use your IDE's built in Git features, the git command line tools, or GitHub Desktop to synchronize your code. Both the IDE Git features and GitHub Desktop features are very self explanatory and easy to navigate through, so I will save time on explaining that part. 1) We will be creating an account on either GitLab or GitHub first. 2) Once you've verified your email, we are now going to create a repository, which is basically our project. 2a) You might want to make this repository private so no one else besides you and your invited members see the code. 3) Change your working directory to the folder you want to set up your project in (cd [directory]), then use git clone [url] to set up the repository. 3a) You might be asked to authenticate yourself. If you are using GitHub, you can put in your username, but then for the password, you will need to paste in your GitHub API Token, which you can get here: https://github.com/settings/tokens. You should select repo and read:org. Make sure you SAVE THIS TOKEN TO SOMEWHERE SAFE, PREFERABLY YOUR PASSWORD MANAGER. This can allow dangerous people to access your repositories, which is not good. 3b) If you are using GitHub, it is recommended you also install this software, as it will save your time from having to paste in your token each time: https://cli.github.com/. When this is installed, all you need to do is to follow steps 1-2, but you will need to type gh auth login and then type gh repo clone. Read https://cli.github.com/manual/ for how GitHub CLI works. 4) voila! Your repository is set up. Just a few important commands to remember: 1) git add . - Adds all your changed files 2) git commit -m "your message here" - Creates a commit with "your message here" being the summary of what you've changed. You can think of commits as 3) git push - Sends your commits to the server. You will run these three commands in order each time you would like to make a change to the Git repository. PLEASE NOTE ABOUT MERGE CONFLICTS! If someone else updated the code, you will need to make sure their changes do not conflict with what you're syncing to the remote. Read https://docs.github.com/en/pull-requests/collaborating-with-pull-requests/addressing-merge-conflicts/resolving-a-merge-conflict-using-the-command-line for more info. Creating your solution, and the CSharp project (.csproj) If you are using MonoDevelop/SharpDevelop/Visual Studio 2019, you will see an option for creating a new project/solution. You will need to click on that, and then give a name to your project, and click "Create". Then, you'll need to download the MCGalaxy_.dll file, and reference it. In Visual Studio 2019, you can reference the file by expanding the project, right click References, and click "Add Reference". Then, you'll select the location to the DLL file. What we are doing here is adding MCGalaxy's main code as a package. This will allow for the IDE to help you with auto-filling methods, and giving hints to the method parameters related to specific parts of the software. It will also allow you to compile the software. Writing the codeIf you do not know how to write code, or if you know how to write code but this is your first time touching C#, that's fine. Please take a look at the below resources available to you: https://www.w3schools.com/cs/index.php https://www.codecademy.com/learn/learn-c-sharp https://essentialcsharp.com/ The fundamental concepts covered in the two websites are very important to what we will be doing. Starting off with a plugin We will be creating an example plugin called "NotifyPlayer", which will alert players if our mascot, John ClassiCube has problem with the player because that player has "cubed" too much. Below is the file "NotifyPlayer.cs": In the above screenshot, we have done the following: 1) Defined our namespace, JohnClassiCubeLand. Namespaces often times help organize our code, and say if we have a large program/plugin we are making, then the namespace generally stays the same for all files in the program/plugin. You can also section your code to multiple namespaces, e.g. JohnClassiCubeLand.HeIsAngry, for if John ClassiCube is really mad at one of our players, and a part of the plugin (if it's multi-file) decides he wants to chop up the player. Note that most times, plugins are single-filed. The reason why this is the case is because a) This allows us to reference other plugins, and b) Many smaller plugins/projects can be compiled quickly with the built-in /compile command, which will save our time from having to locate the compiled DLL and then drag and drop it to our server's plugins folder. In this case, the code can have multiple classes in one single file, and/or have regions defined allowing us to collapse/expand different sections of the code. Example of using regions: 2) We have created the class NotifyPlayer. However, as you see in the screenshot, the class name is underlined red, and on the bottom of the IDE we see there are 3 errors. The reason why this is happening can be explained by the concept of Inheritance. Inheritance comes into play The idea of inheritance or metamorphism can be explained by giving you this analogy: Suppose we are creating a video game and we need to create two objects in the game, a car and a horse. It is agreed that both the car and the horse are vehicles, because they move, but it's just that the way they move are different. Hence, in programming, we can represent both the car and the horse as vehicles, but because the way they move are different, and the noises they make are also different, we need to have a way to define how they function. That is where interfaces and abstract classes come in! This analogy can be associated to what we are doing. There are many plugins on the server, and while not all of them do the same thing, they all need to register and unregister things upon being loaded and unloaded. Therefore, the Plugin abstract class is created for the management of the plugins, and serves as the parent class of them. Using Visual Studio, pressing Ctrl + . will bring up a context menu, and clicking Implement abstract class should fill the body of the NotifyPlayer class with the following code: public override string name => throw new System.NotImplementedException(); public override void Load(bool auto) { throw new System.NotImplementedException(); } public override void Unload(bool auto) { throw new System.NotImplementedException(); } I want you to notice two things: 1) All of these throws exceptions, which we'll replace with what is needed to make the plugin work, and 2) The exceptions all have System. in front of them. The reason why this is happening is because, at least for my file, the using statements were all deleted. In any circumstance, you can choose to include the using statement at the very top of the file, or you can choose to retrieve a method/use anything from a class by typing Namespace.Class instead. Below is how the above code was fixed. public override string name { get { return "NotifyPlayer"; } } public override string creator { get { return "75"; } } public override void Load(bool auto) { } public override void Unload(bool auto) { }Explanations to what I've done above: 1) We're using get return because we're overriding a string, and the parent class, Plugin, is expecting a getter method so it can retrieve the name of the plugin. You can also use a fat arrow lambda expression (=>) instead to do the same thing, which would be public override string name => "NotifyPlayer"; Lambdas are complex expressions that are used to create anonymous functions, and that is out of the scope of this guide. You can view more about them here: https://learn.microsoft.com/en-us/dotnet/csharp/language-reference/operators/lambda-expressions. Please do note that lambdas are not compilable via the standard MCGalaxy compilers. 2) I have also overridden the creator property, which allows us to put the author name (sadly it's not John ClassiCube himself). This will mention our name if the plugin fails to load or unload. I also want you to notice this property was not included in by default, as over the years properties like welcome, MCGalaxy_version, Help, and creator have become optional. These are called virtual properties/methods, which can be viewed here: https://github.com/ClassiCube/MCGalaxy/blob/86af8c8f270f9cfb90798890e829de374c9e412a/MCGalaxy/Scripting/Plugin.cs 3) Given that the properties mentioned in (2) are optional/virtual, the property name, and the methods Load and Unload are required/abstract methods, which can be seen from the above link to the Plugin.cs file. By typing the override keyword however, you will be able to see all available options to override from. Now, let's start with what we want to do with the plugin. We want to let the player know upon joining the server whether or not that John ClassiCube is mad at them, we want there to be a command for the player to check the reason(s) why John ClassiCube is mad at the player, and give the options for staff member, and even JohnClassiCube himself (who is AndrewPH in disguise, who in reality does not even exist!) to add/delete/view the reason why the player is now on John ClassiCube's not-so-good player list. Events I've updated the Load and Unload methods with the following things: public override void Load(bool auto) { OnPlayerConnectEvent.Register(HandlePlayerConnect, Priority.Low); Command.Register(new CmdJohnClassiCubeNotifications()); } public override void Unload(bool auto) { OnPlayerConnectEvent.Unregister(HandlePlayerConnect); Command.Unregister(Command.Find("JohnClassiCubeNotifications")); } private void HandlePlayerConnect(Player p) { } I've done the following: 1) I registered the OnPlayerConnectEvent. Different events, and what they do are all outlined in MCGalaxy's events folder: https://github.com/ClassiCube/MCGalaxy/tree/86af8c8f270f9cfb90798890e829de374c9e412a/MCGalaxy/Events These events allow you to perform an action when a player performs certain action, for example, running a command, sending a chat message, moving, joining another level. Hooking into events would allow you to do a certain action based on what is provided to you. In our case, we will be notifying the player of them having a notification from John ClassiCube. 2) We've registered and unregistered a Command class that we will be making soon. Registering a command is simple, all we are doing is passing a newly instantiated command to the Register method. Unregistering the command though will require us to find the loaded instance first. For this bit, I will need to give you one note: Do NOT unregister new CmdJohnClassiCubeNotifications(); This will not work because Unregister acts like removing items from a list. This newly instantiated object is not the same as the one we registered before! One way to avoid using Command.Find is to store CmdJohnClassiCubeNotifications into a static variable, and unregister that variable instead. Storing user's data Because we need to store the player's notifications, we will need some way to write each player's notifications into the server files. Thankfully, with MCGalaxy, we are given a built in feature, namely PlayerExtList and also PlayerList. These two classes allows us to retrieve data from a text file. PlayerList stores player names into a text file, with each line having one player. You can use Contains, Add, Remove to manipulate the data. Each time Add or Remove is called, you must call the Save method so it can update the data to the text file, if not it will be stored only temporarily in memory. PlayerExtList stores player names and some corresponding data into a text file, with each line being the player's name, followed by a space, and some data. You can use Contains, Update, Get, Remove to manipulate the data. Each time Update or Remove is called, you must call the Save method so it can update the data to the text file, if not it will be stored only temporarily in memory. TL;DR PlayerList retrieves data from a text file and creates a temporary List to store the data, and allows you to do read/write to the list, and you need to call Save() each time for the data to be updated to the text file. PlayerList retrieves data from a text file and creates a temporary Dictionary to store the data, and allows you to do read/write to the Key-value pairs, and you need to c all Save() each time for the data to be updated to the text file. So, now we will be setting up a PlayerExtList to store each player's notifications. public class NotifyPlayer : Plugin { public override string name { get { return "NotifyPlayer"; } } public override string creator { get { return "75"; } } public const string PATH = "plugins/NotifyPlayer/"; public const string PATH_NOTIFICATIONS = PATH + "notifications.txt"; public static PlayerExtList notificationsList; public override void Load(bool auto) { notificationsList = PlayerExtList.Load(PATH_NOTIFICATIONS); OnPlayerConnectEvent.Register(HandlePlayerConnect, Priority.Low); Command.Register(new CmdJohnClassiCubeNotifications()); } public override void Unload(bool auto) { OnPlayerConnectEvent.Unregister(HandlePlayerConnect); Command.Unregister(Command.Find("JohnClassiCubeNotifications")); } private void HandlePlayerConnect(Player p) { string data = notificationsList.Get(p.name); if (!string.IsNullOrEmpty(data)) p.Message("You have &e{0}&S notifications from John ClassiCube. &WView it immediately, or else. &T/jccn", data.Split(',').Length); } }WOW! That was a lot of changes. I will take some time to explain to you what each line does. We've created two constant variables. Constant variables are read-only, compile time variables that store data that can only be read and not modifiable during run time, and does not require a object reference (meaning it's basically static!). These two variables are the paths to our plugin's folder, and the notifications text file to store data I added a public static PlayerExtList which stores player notifications. It is public static because it needs to be accessible outside of the class without being instantiated in an object. I added one line before registering the OnPlayerConnectEvent handler, which is PlayerExtList.Load. This will retrieve the data and load it into memory, or if the text file does not exist, it will create a new empty text file and instantiate an empty list of Key-value pairs. I updated the body of HandlePlayerConnect, and it will now check for if a player has notifications and alert the player upon connect to view the notifications. We're using a extension method from MCGalaxy, namely Split, to split the string by chopping it by where there is a comma (,), and then getting the number of items there are. The notifications in the text file would then look like this: 75+ Notification1,Notification2,Notification3Custom Command Now it's the time to create our command! public class CmdJohnClassiCubeNotifications : Command2 { public override string name { get { return "JohnClassiCubeNotifications"; } } public override string shortcut { get { return "jccn"; } } public override CommandPerm[] ExtraPerms { get { return new[] { new CommandPerm(LevelPermission.Operator, "can set and view all players' notifications") }; } } public override string type { get { return CommandTypes.Information; } } public string[] GetNotifications(string player) { string data = NotifyPlayer.notificationsList.Get(player); if (string.IsNullOrEmpty(player)) return null; else return data.Split(','); } public void NotificationPrinter(Player p, string notification) { p.Message("- &f" + notification); } public override void Use(Player p, string message, CommandData data) { string[] args = message.SplitSpaces(3); if (args[0].CaselessEq("add")) { if (!CheckExtraPerm(p, data, 1)) return; if (3 > args.Length) { p.Message("You need more parameters."); return; } string matched = PlayerInfo.FindMatchesPreferOnline(p, args[1]); if (string.IsNullOrEmpty(matched)) return; List<string> notifications = new List<string>(GetNotifications(matched)); notifications.Add(args[2]); NotifyPlayer.notificationsList.Update(matched, notifications.Join(",")); NotifyPlayer.notificationsList.Save(); p.Message("Notification was added."); } else if (args[0].CaselessEq("del")) { if (!CheckExtraPerm(p, data, 1)) return; if (3 > args.Length) { p.Message("You need more parameters."); return; } string matched = PlayerInfo.FindMatchesPreferOnline(p, args[1]); if (string.IsNullOrEmpty(matched)) return; List<string> notifications = new List<string>(GetNotifications(matched)); string notification = Matcher.Find(p, args[2], out int matches, notifications, null, null, "notification"); bool removed = false; if (notification != null) { notifications.Remove(notification); NotifyPlayer.notificationsList.Update(matched, notifications.Join(",")); NotifyPlayer.notificationsList.Save(); removed = true; } p.Message("{0} rmoved the notification from {1}.", removed ? "&aSuccessfully" : "&cCould not", p.FormatNick(matched)); } else { //elvis operator string player = message.Length == 0 ? p.name : PlayerInfo.FindMatchesPreferOnline(p, message); if (string.IsNullOrEmpty(player)) return; if (player != p.name && !CheckExtraPerm(p, data, 1)) return; string[] items = GetNotifications(player); Paginator.Output(p, items, (p_, notification) => NotificationPrinter(p_, notification), "JohnClassiCubeNotifications " + player, "notifications", args.Length > 2 ? args[1] : ""); } } public override void Help(Player p) { p.Message("&T/JohnClassiCubeNotifications <player>"); p.Message("&HViews the notifications that you or another player has from John ClassiCube."); p.Message("&T/JohnClassiCubeNotifications add [player] [notification]"); p.Message("&HAdds a notification to the player"); p.Message("&T/JohnClassiCubeNotifications del [player] [notification]"); p.Message("&HDeletes a notification from the player"); } }WOAH! That's so much more stuff to take in. You might be asking, what is all this? Well, let's sort this all through one by one. A. General structure of the code All commands generally will follow the same class header, with it being Cmd[name] : Command or Cmd[name] : Command2. When I say generally, I mean it because there are abstract classes that inherit either Command or Command2, and does something specific. This can be seen with the example of EntityPropertyCmd and RoundsGameCmd, where one is used for changing properties of a bot or a player (e.g. skins and models), or RoundsGameCmd where the command inherits this for unified functionality as a RoundsGame game mode command. The general differences between Command and Command2 is this: Command requires you to override name, type, Use(Player p, string message), and Help(p). Command2 requires you to override name, type, and Help(p), with Use(Player p, string message) being optional, and also allows you to override another optional overload of Use, being Use(Player p, string message, CommandData data). The CommandData object passed provides information about where the command is ran, the coordinates of the Message Block if available, and the rank that the player ran as (in which, we don't check for the rank of the player because the player could be running the command via /sendcmd and extra permissions needs to be bypassed). We're using Command2 because we need to check for extra command permissions using the method CheckExtraPerms to check if the player has staff permissions to manipulate player data. As said earlier, typing just the override keyword will show up the properties and methods you are allowed to override... Help(Player p, string message) is an overridable method for providing additional information for the command if they player types /help command <args>, where the message parameter is <args> most others are self explanatory, so I will just leave it at that B. The Body of the Use Method, and the two helper methods The string.SplitSpaces extension method is also a feature that comes from MCGalaxy. This method allows us to split a string into a string array by chopping it up by where there is a space. It also has an overload to limit the maximum of items we can have in that array. In this case as we specified 3 as the parameter, the method will chop at space A, and space B, and then leave the rest as the 3rd item. Then, we use args[0].CaselessEq(...) to check for if the string caseless equals a certain subcomand. In which, CaselessEq is also a built in method. There is also CaselessStarts, CaselessEnds, CaselessContains for strings. CaselessContains is also available for enumerable lists. We use PlayerInfo.FindMatchesPreferOnline(Player p, string name), which is a built in MCGalaxy method to find the exact name of a player as it is stored in the server database so to find the data matching the exact name of the player, and this method returns null if no players of the name is found, which is why we return when that is the case. You can simply check if it equals null, but I just prefer using string.IsNullOrEmpty because it sounds very fancy. ...and that's mostly it Wrap up That's it! You can view the full code here: https://gist.github.com/SpicyCombo/a9034c4912d82b082378aa08a789e2f2 Now of course, that was not everything. There may be a comment or a follow up post either by me, or some other community in the community. For other developers, a few other topics you can talk about are: //reference and //pluginref, the usage of external libraries and referencing other plugins Manipulating the Database Registering/Unregistering TopStat (which is easy, someone can just post the links down to an example) Custom events (which Venk has done, and I've done so as well.. idk If I'd like to share it though) Other Tidbits1) Reading the GitHub MCGalaxy wiki, and expanding the section "Technical info (for developers)" will provide information on commands to compile and load the plugin using the built-in compiler, and API changes/breakages: https://github.com/ClassiCube/MCGalaxy/wiki/Scripting. You should check here if you see something built in not working, and you need to fix it. 2) If you are using Visual Studio 2019, it's recommended to use the hotkey Ctrl + Shift + S every now and then to save all files in your project. This will avoid surprises if your computer suddenly loses power, this is so your changes are saved before anything out of ordinary happens. Final wordsWith anything in life, the more effort you put into something, the more you will get out of it. If you ever get stuck writing code, or need some concept explained to you, feel free to ask someone in the community for help. The forums, ClassiCube Discord, server owners/developers will be here when you need it. With all that being said, I wish you all, the readers the best of luck, and hope your next project will succeed (with a lot of glory). :D 75 is your Helpful Coding Assistant (HCA) [transmission ended]
-
Enhanced mode ClassiCube is selectable from Options > Mode > Enhanced. Enhanced mode allows you to use Extended CPE, which is required for custom blocks, particle effects, etc, and is required for most popular servers. ClassicalSharp is the client before the current ClassiCube client written in C. If you have time to waste, you can go to the ClassiCube GitHub page and try to find the last commit before ClassicalSharp was archived: https://github.com/ClassiCube/ClassiCube/commits/master/ It is not recommended to use ClassicalSharp as it has exploits, which is why it's banned on some servers. ProtoLauncher is a simple .bat script file that allows for you to click on the Direct Connect link on the website facing server list, which will launch your game client to join that server. It registers the mc:// URI to your Windows registry. If you want to set that up, you'll need to download the batch file and modify the executable from ClassiCube.64.exe to ClassiCube.exe, and also update the link for where the latest game client is downloaded from, which is now https://cdn.classicube.net/client/release/win64/ClassiCube.exe. Hopefully this answers some of your questions.
-
GistOmegabuild ThemeColor pluginOmegabuild ThemeColor plugin. GitHub Gist: instantly share code, notes, and snippets.ThemeColor plugin allows the player to change their chat's colors for system messages. To set this up: 1) Add two separate color tokens, and it's suggested you name them Primary Color and Secondary Color 2) In server.properties, set the defaultColor and help-desc-color to the two color tokens you've just created 3) Add the above .cs file to your MCGalaxy server's plugins folder 4) Run the commands /pcompile ThemeColor and /pload ThemeColor 5) /CmdSet ThemeColor to a staff rank you prefer, and run /economy themecolor enable to enable the store item for all players. 6) Voila! Enjoy.
-
If you want permanent hosting, your best bet is to either pay for hosting from a provider, or if you are willing to make a good server with custom content, you can ask MCCH for a server, for if you have a good plan on spending time curating something unique, rather than a typical freebuild server. It is not cheap for hosting companies to rent or maintain their own servers. There is also another host (Eddyn.net) that offers free server hosting, but the service has been down for a while now and there is no way for server owners to retrieve the files. Quite unfortunate.
-